How to Get Streamlabs to Read Api Command
Creating a Twitch Command Script With Streamlabs Chatbot
Step-by-pace guide to creating Twitch commands
![]()
NOTE: This article still very much does the trick, but there is a more seize with teeth sized series you can discover hither, where much of the unnecessary text has been cleaned up and the manufactures are more focused per subject.
You're probably here considering you want to brand a Twitch command. A absurd trivial feature that spices upwards your video chat or, in my case, that of someone else.
For the people that stumbled acr o ss this thinking: "Wait, what? Twitch commands?" — A Twitch command is a trigger set up in the viewer chat that, when invoked, usually returns an automatic bulletin.
It'due south meant by and large to summon more interest for the stream and to engage viewers more than.
If you're part of the sometime group and have been looking online for an easy guide to create such a command, I was you non then long agone.
Backstory fourth dimension!
In a affair of a couple of months, I had made friends with a very cool streamer on Twitch: theSlychemist.
After seeing the time and effort this guy was putting into his work and the overall kind demeanor, I decided to go far a personal goal to aid him grow his aqueduct.
Being a .NET developer past trade, I offered my services and he asked me whether I'd be able to create a command for him. I figured it couldn't exist that hard, just a bit of Googling and Python programming, no biggie. And then, I said: "Sure!"
I hope you read that with a Morgan Freeman vocalization-over in your head.
I was half correct (or one-half wrong?), because there is some documentation bachelor, but not plenty to get yous to hitting the ground running.
Fright not! This postal service is my try at helping you do only that, so you lot won't accept to experience what I went through in getting my very get-go Twitch control upward and running.
The postal service might seem big but about half of it is optional bonus material, placed in Appendix A and B.
Necessities
To be able to follow along, at that place are a few things y'all'll need:
- A Twitch account — For testing your commands earlier release. You probably already have one, why else would you exist here?
- Streamlabs Chatbot — This volition process and run your commands, and provide logging for debugging, which you will most definitely need. Log in with your Twitch business relationship for both the Bot and the Streamer.
- An IDE that tin compile Python. I use Jetbrains PyCharm Customs Edition, considering it'southward both free and very adept. It has IntelliSense born, it knows the PEP eight styling rules which helps proceed your code clean, and you can easily test your methods if you need to. Feel free to utilise the code editor of your choice, as long as it tin can compile Python. That volition salve you quite a few light-headed bugs compared to coding in Notepad.
- Python 2.vii.thirteen. Yeah, Python is on 3.7.4 at the time of writing, just Streamlabs Chatbot works with a compiler that works with 2.7.13. Don't shoot the messenger. Later on this, open up Streamlabs Chatbot and head to the Scripts section. Click the settings icon in the upper right and add the path to the
Python27\Libfolder (not Libs). If you allow Python install itself with default settings, it should exist inC:\Python27\Lib:

- At least some basic programming skills are causeless throughout this post. This is a post on creating Twitch commands, so I won't exist diving into variables and method/office calls and how they work. You should be comfortable with those terms earlier continuing.
What Are We Building?
So aye, apparently we're going to write some code, simply what are we really edifice?
As this is intended as a foundation for setting upward and releasing a command, we'll keep it unproblematic. Let's make a command that, when invoked by a viewer, returns a message stating the odds that this person is actually from outer space.
Convoluted example, just don't worry, it's nowhere near equally difficult as it sounds.
Basic Setup
All Streamlabs Chatbot (SC) commands have some basics you need to have implemented correctly for information technology to even announced as a runnable script in their UI, allow alone run it.
These are:
File naming
For the Python script to be picked upward every bit a script for SC, the format should be command_StreamlabsSystem.py.
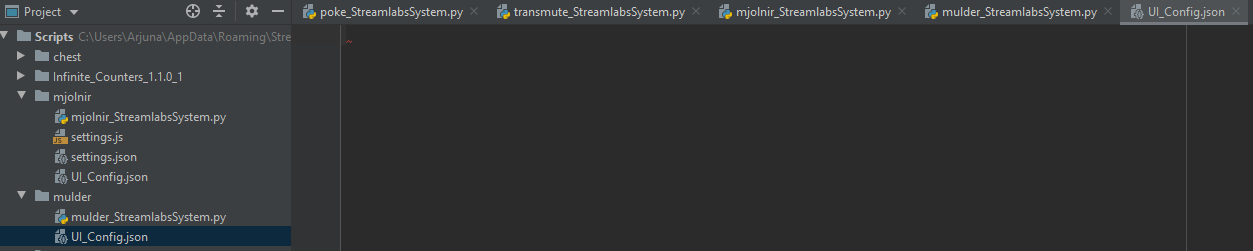
And so, let's start by creating a mulder directory and within that directory, create mulder_StreamlabsSystem.py.

You're free to choose where to create this directory, as long every bit information technology'south named the same equally the command.
Pro tip: If y'all create it in the internal SC scripts directory on your car, it will salvage a lot of work importing and updating when nosotros hit the test/release footstep.
On Windows, y'all'll detect it at:
C:\Users\USERNAME\AppData\Roaming\Streamlabs\Streamlabs Chatbot\Services\Scripts. Basic structure
SC won't testify your script in the scripts department unless it contains at least the post-obit:
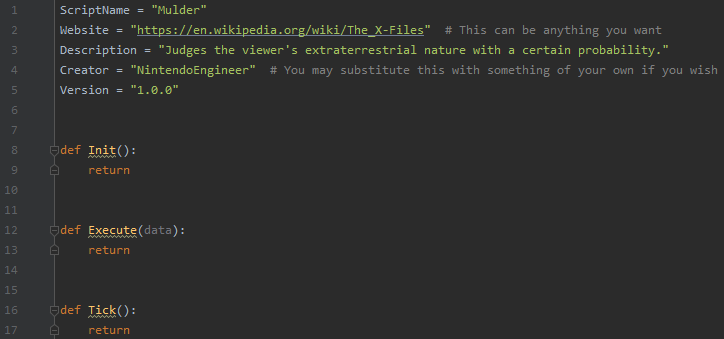
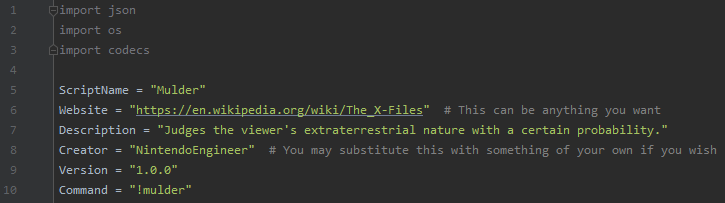
- Script data — this is a fix of global variables SC uses to populate some of the fields in the
Scriptssection. Let's add together these to our empty script:

- Script initializer — the
Init()method is run by SC every fourth dimension the script is (re)loaded in theScriptsdepartment. Add the following nether theScript Information(add together a new line commencement for cleanliness):

- Script execution: the
Execute(data)method is run by SC every time any command is typed into the Twitch video chat. We'll address how to filter only themuldercontrol in a bit. Theinformationparameter is passed past SC automatically and contains information near the sender and the message. Permit'south add together this to our script:

- Script iteration logic: the
Tick()method is run every time the script progresses, then every tick, equally the name suggests. This is logic that runs fifty-fifty when there is no incoming data or anything in the chat. It just runs continuously. Let's add it to our script:

Correct! Now we take what we demand so SC will at least admit our difficult work. Your file should look like this at present:
If your file doesn't expect like this, make sure to make the necessary adjustments.
Loading the script
If you took advantage of the pro tip before on, this is going to be a slice of cake. Only open SC, go to the Scripts section and it should already exist there:
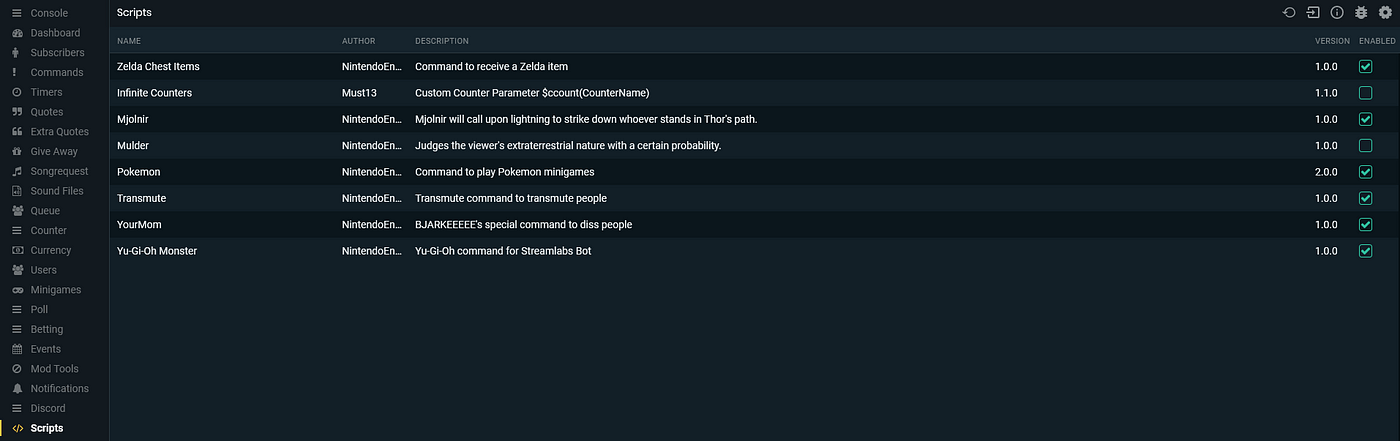
You tin see the Mulder command and some of my other commands (to see them live, check in to a stream of theSlychemist).
All of them are in the same SC Scripts binder, and then they appeared automatically when I created them.
If information technology didn't appear, try hitting that reload button in the upper right corner. If it still doesn't appear, check all the previous steps or try the option below.
If you didn't follow the pro tip, you're going to have to take the long way effectually:
- Utilise your preferred tool to zero the
mulderdirectory. - Go to the
Scriptssection in SC and hitting the import button in the upper right corner (2nd push from the left). - Get to where the
.zipfile has been stored and select information technology for import. - It should now announced in the list.
Fair alarm: If you're loading the command like this, it will get very dull very fast when you lot take to debug code. You lot'll be changing code, zipping the file, importing it, and and so you can test it.
If the ready didn't work, y'all can do the whole thing all over again. You can avoid this past following the communication given in the Basic Setup section. So, it becomes as simple as hitting the reload button.
Implementing the Logic
Now that we have the foundation out of the way, information technology's time to add some functionality, or logic, to our script.
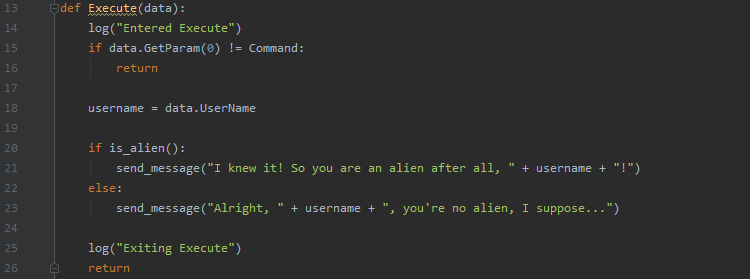
Our command logic goes in the Execute(information) method, which gets called by SC when a message is posted in the chat.
There are some gotcha'due south to consider but I'll guide yous through information technology, so permit's get to it!
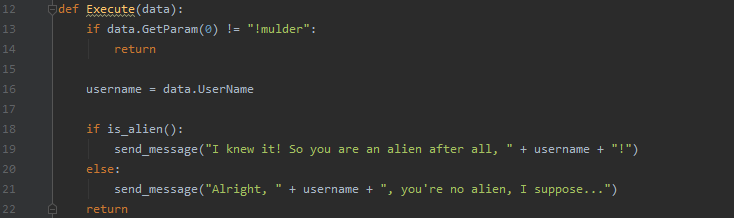
Remember how I said that any control (or message, for that affair) in the chat volition trigger our Execute(information) method?
As we only want to respond to the command "!mulder", we should verify that the starting time thing in the message actually says that. Nosotros use the data parameter that is passed for this, as information technology contains some properties and methods we tin leverage.
One such method is the information.GetParam(int id). We'll utilize it to get the first thing in the bulletin and verify if it equals "!mulder". If it doesn't, we don't do annihilation. Only enough talk, let'due south implement it:

Our command should state whether someone is extraterrestrial or not, based on probability.
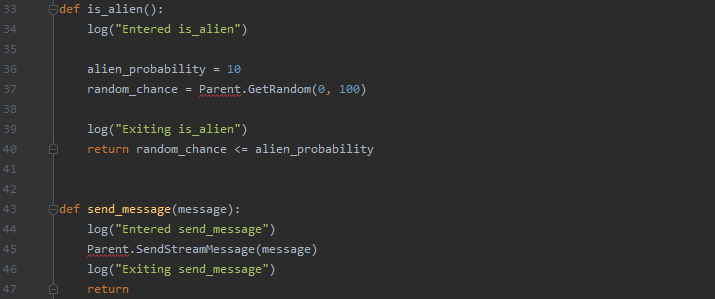
Let'southward innovate that probability and give it a value of about 10%, and so every one out of 10 people is really an alien. Well, damn.
Also, deciding whether someone is an conflicting is a separate micro-responsibility that we can consul to a utility method, is_alien().
Let'due south add together that method under the Tick() method and add together the probability to it:

Now, nosotros need to beef that upwards and have it render Truthful if someone is an conflicting and Simulated if not.
Python has native random methods only they don't seem to play well with SC. We're going to utilize the random functionality that SC provides, namely Parent.GetRandom(int min, int max ) to render a value between 0 and 100.
If we get a value lower or equal to our probability, nosotros render True, otherwise, we return False (you tin ignore the Parent error):

Based on the outcome, nosotros will ship back i of two messages to the chat.
To make things more legible, allow'southward introduce some other utility method that will handle sending messages for the states: send_message(message). You lot can add the following nether the is_alien() method:

We're going to utilize the username of the viewer who triggered the command in both possible messages.
As we have to become that from the data parameter and we don't desire to violate the Dry out principle (Don't Repeat Yourself), allow'due south introduce a variable to agree that username for us:

Now, we need to send the messages based on the is_alien() response. Adding that logic completes our control logic:
Trying It Out
Outset off, go to the Scripts department of SC, reload the scripts equally before, and make certain you enable the Mulder command by checking the box on the right.
It should look like this when you're done:

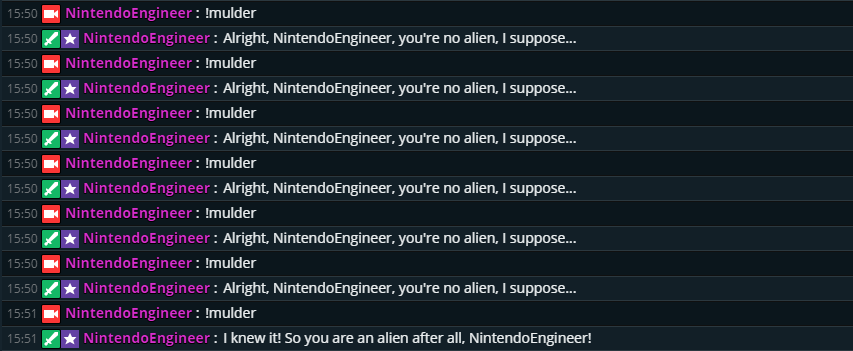
Now, caput over to the Console section of SC (upper left), blazon !mulder in the chat and hitting enter.
Magic ensues! Mulder is judging your very nature. Information technology took a few tries but he finally managed to effigy out I'k non from this planet:
May I congratulate you on writing your commencement Twitch control script? This is my basic period when creating commands for theSlychemist. You could stop here, run off, and create an array of commands and you're free to do then.
However, if you want to take a chip more communication from a random dude on the internet — read the next few sections too, at to the lowest degree the part about debugging your code. It's going to prove to exist a life-saver.
Appendix A: Debugging
I know, I know, not the sexiest subject field to exist talking virtually.
Scripts should just work every bit you imagined when you lot coded it and that should exist the end of it. I accept this thought pretty often when coding and that's because almost nothing e'er works in one go.
Even the example project above needed a few tweaks for me to become it right, because silly mistakes happen (don't worry, the script works as shown, I just had to fix mine kickoff). So, permit'south swoop into debugging with SC.
Logging
This is basically all I demand to show you lot. Logging what your script is doing and when it'due south doing it is the fastest way to find out where a issues could be hiding (ready those flyswatters).
Luckily, SC has a log method of its own: Parent.Log(string command, cord message) and we are going to use that.
Let'south become to it.
Showtime off, that log method looks kind of bulky and, as we're going to utilize information technology more than once, let'south create a utility method to wrap it in.
The added benefit is that nosotros don't demand to specify the command every time we want to log something. It stays the same anyway and doing information technology this way keeps us DRY:

I noticed that nosotros're using the literal control name in two different places and this violates the DRY principle, so allow's fix that.
Add a global variable to the ones we already have and replace all instances of "!mulder" with that variable:


At present, permit'south add some log statements to the methods we're using:
Good things are happening hither. Reload the script in SC and then move to the log window past clicking the middle icon in the upper right:

Articulate the window with the reload symbol in the upper right and move to the Console department of SC. Enter !mulder again and move dorsum to the log window.
It should show yous the logs as information technology flows through the dissimilar methods:
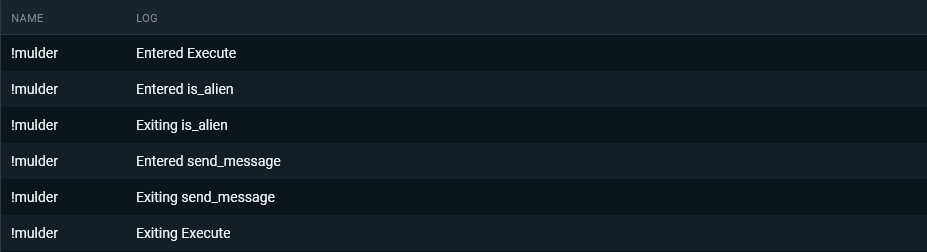
There are quite a few things that could go incorrect in a programme and having logs to pinpoint the location will salvage a lot of time when debugging these problems.
Every bit you continue to create more advanced commands, y'all'll recognize where and how to place logs to verify right values are being passed effectually or to check if the method y'all need is actually existence called.
Yous can do a lot with logs.
Appendix B: Nice to Have
Here is some neat stuff you could add to your command to make it simply a footling bit cooler, but they're by no means necessary to create your commands.
Adding a cooldown menstruum
You might non want your commands to exist available to everyone all the time, even though they're awesome. Y'all could have a busy conversation or someone could be a troll and spam the command all the time.
That'south where cooldowns come in. SC has a few handles to add together and check for cooldowns on a user or a command. I'm going to prove the user-specific cooldown here.
It involves ii small additions:
Add the user cooldown at the end of the Execute(information) method, using data.User to get the user ID of the viewer and specify 30 seconds equally the cooldown time:

Now, at the start of the Execute(data) method, in the command check, include an extra check for the user cooldown.
If a user calls this command again while all the same on cooldown, nosotros don't want to execute our logic. Calculation that flake of logic:

Checking whether I tin can trigger the command before long after each other yields a promising result. The command does not execute, considering I triggered it in the concluding 30 seconds:

Now y'all know how to add a user cooldown.
Adding a cooldown for the command itself has a similar flow, simply substitution the user cooldown methods with the command cooldown methods.
Adding UI
Y'all may or may not have seen an interface in SC for some commands where the controller can change values used in the script. Information technology looks something similar this:

The huge added benefit is that things like cooldown time and other values can be inverse from outside of the script, without having to touch the script at all.
This saves quite a chip of piece of work and makes the script easier to handle for people who aren't used to scripting.
I want this for our script, and so let'due south dive into it:
First off, let's create the UI_Config.json file in the same folder equally our Python file. Get the naming right, create information technology and open it in your IDE:
SC has the format and options of the file documented on their GitHub Wiki page. First, we take to choose the name and blazon of file our values will exist dumped in to utilize in our script.
Add the following to the file:

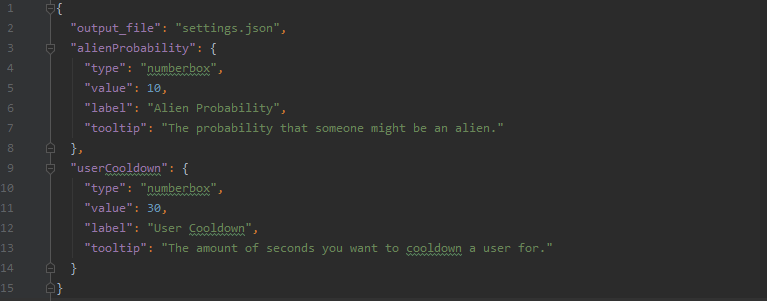
We need two values for our script: the probability in percentages and the cooldown in seconds. Both are numbers, then nosotros'll need a numberbox for both.
Let'due south add together those and fill in the fields:
Save the file, go back to the Scripts section in SC and reload the scripts.
When you now click on the Mulder command, it shows our fresh new UI:

We're non there even so, friend. Remember the output file we defined? Hitting Save Settings in the UI and head back to your IDE.
Yous should see two new files created:
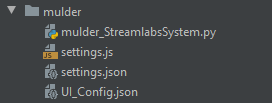
We're interested in the settings.json file, which is the file nosotros defined. If you open up information technology upward, you'll see our defined values and their information:

We now desire to use these dynamically updated values instead of the hardcoded ones in our file. To this end, we'll demand to import some libraries to help with reading out this settings file.
Add the following in a higher place the global script information variables:
Earlier we load the file, we demand to have something to store these variables in. Allow's create a global settings object to that end:
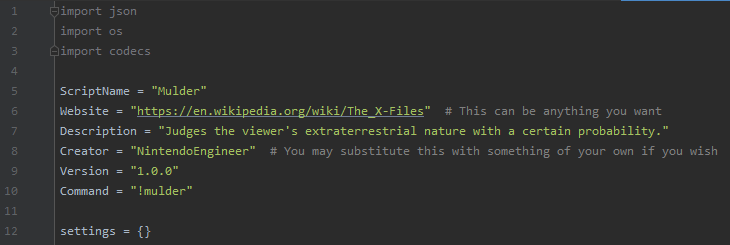
We merely desire to read these values in once, when the script is (re)loaded. In that location is no need to read those every time the script executes.
Which method runs only in one case per (re)load? Yous remembered! Information technology'southward the Init() method. Let'southward start calculation logic to information technology step-by-step.
Starting time, we demand to allow Python know we are going to change our global settings object:

We're going to need to access the settings.json file.
As it's in the same identify every bit the current script we're in, we can enquire Python to go the path to the directory we're in right now for subsequently apply:

Alright then! Now, let's get to the juicy bit: reading the file and storing the contents in our settings object.
Nosotros're going to construct the full path to the file with the working directory we defined earlier and bring together that with the actual filename. Make sure the filename is exactly the same every bit the filename defined in UI_Config.json:

Great! Now that we have loaded the settings, we can utilize that object to access the values defined in the UI.
Let'south replace the hardcoded values with the dynamic reference to their counterpart (Make sure the spelling matches the spelling in the UI_Config.json file):


Test time! Caput towards SC, get to the Scripts department and reload the scripts.
Calling the control in the console yields the outcome nosotros had before, but now we can dynamically change our values from outside of our script:

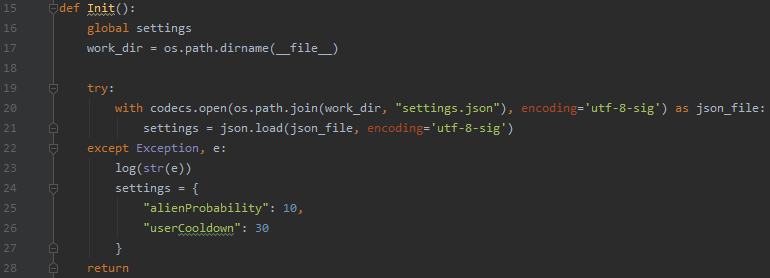
Bonus bespeak: We tin can grab a possible mistake when trying to read our settings file. In our electric current scenario, a read error would result in the script breaking, but if nosotros catch and handle this error, we're able to build a fallback.
This is the cleaner way to handle this. The following code catches whatever error, or exception in Python lingo, logs the error for research, and provides fallback values so the script tin continue while y'all calmly investigate what'south happening:
And that'southward how you comprise UI!
The End
I want to say that's all in that location is to it and that'd be true, but I understand that all these steps can seem quite daunting for a newcomer. However, don't worry about information technology. Later on creating a few commands, this will go second nature to you, guaranteed.
This was the "basic" step-by-footstep to create a Twitch command script.
Is that all in that location is to information technology? Yes and no. Yes, this is how you ready a control script and, no, there is so much more y'all can practise within Python.
The options are about-endless. For a drove of unlike basic, semi-advanced, and extremely advanced commands, take a look at a stream of theSlychemist. Well-nigh of my commands are visible there.
Depending on how well this post does and if there'due south interest for a mail on more advanced techniques, I'll create a few more posts showing how to play music, timeout viewers, and even use global state to "think" viewers and their previous deportment.
Thank you for reading and recall: The truth is out there…
starnercareekeres.blogspot.com
Source: https://betterprogramming.pub/creating-a-twitch-command-script-with-streamlabs-chatbot-step-by-step-a9f8cccd680d
Post a Comment for "How to Get Streamlabs to Read Api Command"